Wednesday, March 30, 2016

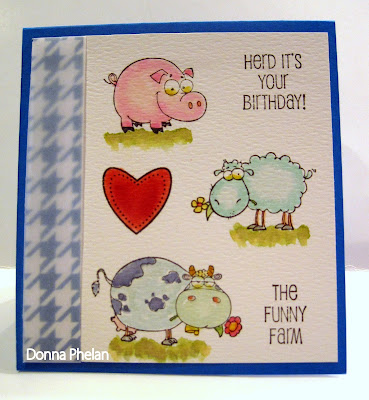
The Funny Farm

Hello!

This card will be entered into the Challenges at Stamp TV, Humor, Simon Says Monday, We Can See Clearly and Simon Says Wednesday, Anything Goes! 

 
This is one of the cutest little stamp sets I own, Funny Farm by Gina K Designs, the heart is from her True Love set.......C'mon just look at those FACES!  lol  They crack me up every time.  I decided to do a little water coloring.  This card is quite different than a lot of my other cards.  It's cute and sweet and has no adornments, super flat, easy to mail!  Yet, I feel it is not lacking, so that is a breakthrough.  Less is more......sometimes.

 
I added a bit of Designer Paper to the left which is covered with a piece of Vellum.....I mean I HAD to add something, but, that's it.
 
Those Faces!!!  Look at that pig, you know he's up to no good....hahahahaha
 
Thanks for popping in, appreciate you doing so.  Now go put a smile on someone's face!  You'll be happy you did!
 
Enjoy~~


Tuesday, March 29, 2016

Hello!

Good Morning!  Ever since I typed that title I have been singing Adele......she sticks with you all day long!

My card for today will be entered into the Challenges at MFT Sketch, MFT Color, and Simon Says Monday, We Can See Clearly.


But for the layers, it's quite a CAS card.  The flower image is by Penny Black, Blooming Garden and the sentiment is from their Blooming Tags set.  My MFT products are; Blueprints #12, Cross Stitched Rectangles and Stitched Traditional Tags.  

 
All card stock layers over a Vellum base.  Images colored with Copic Markers.  Eyelet, Sheer Ribbon, Sequins, and Liquid Pearls in Flamingo.
 
Nothing fancy, just a simply sweet little card.
 
Thanks for stopping by.
 
Enjoy~~


Saturday, March 26, 2016

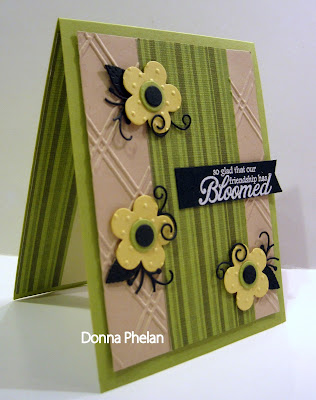
Blooming Friendship

Hello!  It's Spring....and every other day it actually feels like it.....we are flip flopping back and forth from winter.  We'll get there!  I bought some flower seeds yesterday and have been on a flower making and coloring kick.  What a glorious time of year. 

I made another flower pot card, love them!  This will be entered into the Challenges at Dies R Us, Handmade Flowers and Cheery Lynn, Anything Goes!

 
The flowers were cut using my Cameo and are Windflowers.  I thought bright sunny yellow ones would be perfect for Springtime!  The flower pot is also a cut file.  I assembled the flowers added the leaves and Liquid Pearl centers.  The background is a 'cut' from the Recollections Brand from Michael's. I got this great little paper pack in pinks and blues. 

 
Fanciful Flourish by Cheery Lynn, which I cut placing portions where I wanted them, including the 2 little leaves on the sentiment tag.  MFT Stitched Traditional Tags die and Sweet Roses sentiment. Ribbon for accent.  And I topped the flowers with a Vellum Butterfly 6 die with a large pearl center.
 
Happy Spring!
 
Rebirth.
Renew.

From Me To You

Good Morning!

This card will be entered into the Challenge at Papertrey Ink, Ink Blending Over Heat Embossing.

 
I used the Daydreamer and Swoosh stamp sets and the Hexagon Cover Plate die all from Papertrey Ink.  Using Versa Mark Ink I stamped my 'foliage' and covered it in White Embossing Powder, then I heated it.  Blending Tempting Turquoise over the embossed panel, leaving some white spaces too.    Love the look of them all scattered about and the ink really makes them POP!    I cut Blue Raspberry and Designer card stock out using the cover plate, which I trimmed down, only using a portion.  This still lets my embossed 'foliage' peek through.  

 
Stamped my sentiment and added that panel and one lone enamel dot for accent.
 
FUN!
 
Thanks for popping in!
 
Enjoy~~


Friday, March 25, 2016

Papertrey Ink March 2016 Blog Hop

Good Morning!

Once again I am participating in the monthly Blog Hop at Papertrey Ink.
 
 
Inspirational Photos
 
And here is my creation:
 
 
I used the Papertrey Ink stamp and die sets, Flower Favorites.  I was drawn to the colors and the flowers from the photos.  I wanted the White Embossing Powder to give you the flavor and feel of the embroidery.  It works for me!  :)   After embossing the flowers in white, I stamped the centers of the flowers in Real Red ink and then embossed them in Clear Embossing Powder to seal the ink in.  Worked perfectly!  One set of flowers has been layered to a very thick piece of card stock to add more dimension, think chipboard almost.

 
MFT Bracket Edge Duo die.  Yellow Floss Thread and additional inks in Always Artichoke, Crushed Curry, Night Of Navy, and Old Olive.  Sentiment stamped in Black Licorice Swiss Dots Embossing Folder for texture.  Butterfly popped up using dimensionals.
 
Thanks for HOPping by! 
 
Enjoy~~


Monday, March 21, 2016

You Make My Heart Bloom

Hello!

The 2nd day of Spring and it's snowing!  I would love to be able to get outside and garden, but for now I will try to make some paper flowers and create my own little garden.....inside.

Today's card will be entered into the Challenges at Cheery Lynn, Anything Goes!, ScrapyLand, Think Green and Dies R Us, Handmade Flowers.

 
It kind of looks like a mess from here, but IRL it looks pretty good!  The Flower Pot is a Free Cameo Cut I found online.  I assembled it and then using the Frugal Crafter's VIDEO I 'Patina-ed' it, with Rusty, Green and Gold Embossing Powders and Craft Paint in White and Teal.  Loved her technique!  Then I began cutting out all of my flowers and leaves from an SVG Kit, 3D Flowers II.  They are not fancy just sweet little Impatients.  I added Liquid Pearls to the centers and placed them in my flower pot.

 
The viny flourishes are by Cheery Lynn, Fanciful Flourish, I die cut 2 and snipped them apart, placing the pieces where I thought they would look best.  Mini Adhesive Pearls placed randomly.  The sentiment is by Gina K Designs, A Little Something (how perfect!)  The Vellum Butterfly, is by Cheery Lynn, Butterfly 6,  which was an afterthought, but I do like the look.  
 
Thanks so much for popping by!
 
Enjoy~~


Friday, March 18, 2016

You Are Simply Fabulous

Good Morning! 

Today's card will be entered into the Challenges at MFT Sketch, Simon Says Monday, Use Some Lucky Stars, ScrapyLand, Think Green.

 
I decided to make a fun little Shaker Card for my daughter's Mother-In-Law's 60th Birthday.....shhhh it's a surprise!  Using Fun Foam, Plastic Packaging from a Spellbinders set (I have saved them all) MFT's Blueprints #12 dies and Spellbinders Classic and Scallop Circles die I made the Shaker portion, tossing in some Green and Gold Glitter and Green and Gold Stars Confetti.  Super easy, super fun!

 
I used the MFT products; Cross Stitched Rectangles and Blueprints #12 dies as well as the Simply Fabulous Sayings stamp set.  I stamped my sentiment in Always Artichoke ink and then covered it in WOW! Clear Embossing Powder, which I heated, leaves a nice subtle sheen.  Paper Smooches Foliage 1 die.    I made 3 small flowers using Spellbinders Scallop Circle dies, sponging the edges, wetting, crumpling and drying.  Added brads and topped with pearls for centers.  Random Adhesive Pearl accents.  Sheer Ribbon. 
  
Star Confetti & Handmade Flowers
 
Hope this card makes her feel like a kid again.....shake, shake, shake, shake, shake, shake, shake your booty......shake your booty......
 
Enjoy~~


Thursday, March 17, 2016

Round Happy Birthday Card/Tag

Good Morning.....it's been so long!

Today's creation will be entered into the Challenge at Papertrey Ink, Create Along With Us, March 2016.

I fell in love with Kay Miller's GORGEOUS Script Swirls Birthday Tag:

 
Fantastic, right???  So I thought I would CASE her project.
 
Only  I am calling mine a CAPE.....Copy And Pray Everything -- looks ohhhkay.
 
 
I used water color paper and painted my inks in; Bermuda Bay, Crushed Curry, Tempting Turquoise and Wild Wasabi, this is kind of fun, especially when they do not turn 'muddy' as so many of my projects do.  I then used Spellbinders Classic and Lacy Circle dies to create my shape and frame.  A Stampin' Up! Tags And Labels Framelit die was attached in between my layers.  Added an eyelet and some cording as accents as well as a swirl strip of Adhesive Black Pearls (which I cut).


I used the Papertrey Ink products; Swoosh and Phrase Play # 5 dies (I dissected the 'happy' from the PP#5 die) and the Flower Favorites stamp and die sets.  A bit of Wink Of Stella Clear on the butterfly accent.

I know I can not compete with Kay's but she certainly inspired me to try!

Thanks so much for stopping by!

Sláinte

Friday, March 11, 2016

Blooming Blossoms

Hello!

This card will be entered into the Challenges at MFT Color, MFT Sketch, Simon Says Wednesday, A Bit O' Green, Double D, Feeling Green, and WOW! Embossing,   Use Heat Embossing.


I used the MFT products; Blueprints #12 dies and Sweet Roses stamp set.  I also used Poppy Stamps Verona Flourish die (cutting off a portion of the leaves).  Swiss Dots, Lattice Embossing Folders.   

 
White Embossing Powder, heated, for the sentiment. 
 
Happy Blooming Spring!
 
Enjoy~~


Happy Shamrock

Good Morning!

Today's card will be entered into the Challenges at Cheery Lynn, Doilies, Double D, Feeling Green, and Dies R Us, Shaped Cards.

 
Well it is March and I do need a St. Paddy's card.....love when Challenges collide!  :)  I cut out the Shamrocks with my Cameo--how easy this makes my life!  I then layered the Green textured card stock on the White card base, adhering both pieces to create my card.  I topped it with a pretty doily, it almost gives it a Celtic look and feel.  Then using the same Green textured card stock I cut a Fanciful Flourish by Cheery Lynn.  Whipped out my Spellbinders Hearts dies and cut out 8 hearts, 4 in each color and in 2 different sizes, this created another Shamrock / 4-Leaf Clover.  I used a Zot to attach it to the card base.  A Zot is a THICK Glue Dot, very strong, very sticky, and because of it's thickness, gives this more dimension.  I also folded the 'hearts' a bit to add even more depth.  Topped with a lone Adhesive Rhinestone.  The sentiment is from Fairy Tales by Gina K Designs, stamped on a hand cut flag banner.
 
May love and laughter light your days,
and warm your heart and home.
May good and faithful friends be yours,
wherever you may roam.
May peace and plenty bless your world
with joy that long endures.
May all life's passing seasons
bring the best to you and yours!
 
Enjoy~~


Thursday, March 10, 2016

With Heartfelt Sympathy

Hello!

This card will be entered into the Challenges at; Papertrey Ink, Sponged Stamping, Simon Says Monday, Make Your Own Background and Simon Says Wednesday, A Bit O' Green.

 
I used the Papertrey Ink's stamp set, Through The Trees.  I stamped the tree trunk first and then lined up the beautiful leaves.  Inked the stamp up with Pear Pizzazz and then sponged on Wild Wasabi and Garden Green inks.  The technique works well and gives a subtle color change to my leaves.  The base of the card was stamped willy nilly with the leaf stamp using Antique Linen ink, gives it a nice subtle look.

 
I then took some masking tape and rubbed it on to the Antique Linen ink pad, smoothed it over the base of the tree and then pulled it off.  It gives a nice smattering of ink as the ground below.  This was then mounted on a panel of Brown card stock that had been cut using the MFT Bracket Edge Duo die.  I also added 3 thin strips of tan Washi Tape.

 
Here you can see the different shades of the green leaves.
 
Thanks for coming by, love it when you do!
 
Enjoy~~


Easter Blessings

Good Morning!

Today's card will be entered into the Challenges at; Stamping Sensations, Flower Power, ScrapyLand, Anything Goes! and Simon Says Wednesday, A Bit O' Green.

 
I used stamp sets form Gina K Designs, A Beautiful Life and Spring Floral.  I stamped and colored images with Copic Markers.  I then stamped all 4 tulips again, colored, and fussy cut them out, topping the already stamped tulips.  This gives the card a little more dimension and interest, yet still quite flat for easy mailing.
 
 
I then mounted that panel on a piece of Black card stock.  The Cheery Lynn Butterfly 6 die was cut out of Toner Paper which I then ran through my Mini Minc using Rose Gold Foil.  Love the subtle hint of pink in it.
 
A simple card.....but it's wicked pretty (ala my Boston accent)  ;)
 
Thanks for popping in, I feel Spring is in the air!  Wanna come rake???
 
Enjoy~~


Wednesday, March 9, 2016

It IS Easy Being Green!


Happy Wednesday!


I'm hosting the Challenge at The Mod Squad Blog.  Hope you find some time to play along!

Challenge.....It IS Being GREEN!

The challenge this week...is to make a card that incorporates all shades of GREEN.  You may also use neutral colors in Black, White and Kraft.....but that's it!

This Weeks Sponsor is CAS-ual Fridays Stamps
http://cas-ualfridaysstamps.com/

All the stamps and Fri-Dies are designed by Michele , and are based on her love for Clean And Simple design, hence the CAS in CAS-ual. However, they will delight any stamper's style! Whether you are a CAS enthusiast or a lover of Utterly Adorable Layers, you will have a blast getting inky with them. 

The stamps are made in the USA of the finest clear photopolymer, and the coordinating line of wafer thin dies are also made in the USA.

 
2 Prizes

2 - $15 Gift Certificate each to the STORE

1st Card
 

I used the fabulous stamp set, Casual Comfort on this card.  Inks in Garden Green and Pear Pizzazz.  3 small Adhesive Rhinestones for accents.
 
2nd Card


This card also uses the Casual Comfort stamp set and the matching dies Casual Trees.  I inlaid the die cut for this card.  Inks also in Garden Green and Pear Pizzazz.   One large Adhesive Rhinestone and a wee bit of Ribbon for accents.


Casual Comfort

 
Casual Trees

Come check it out!!!

Tuesday, March 8, 2016

Peek A Boo Sketch

Hello!

This card will be entered into the Challenges at Power Poppy, Peek A Boo SketchStamping Sensations, Flower Power, ScrapyLand, Anything Goes! and Simon Says Wednesday, Touchy Feely.


I used the Short Stack stamp set from Power Poppy.  Images colored with Copic Markers and hi-lighted with a Wink Of Stella Clear Pen.  I stamped the whole image on the right and colored the entire thing....silly...as you can only see a portion of it.  Windows were created with Spellbinders Classic Circle dies.  Swiss Dots Embossing Folder for texture.

 
A few Pink Sequins and some pretty Pink Gingham Ribbon for accents.  I used a bit of Fun Foam as a backing for my cut out panel, it gives the card a bit more firmness and structure.
 

 This was my first attempt.....yikes! 

 
This may not be much of a peek but more of a I see you!  lol  Let's just say it warmed me up for the card above.  I used the Short Stacks stamp set from Power Poppy.  Images colored with Copic Markers.  Added a little bit of Stickles to my sweet little bird and Corner Tab Punches for accents.

 
The 2 larger 'windows' were die cut using Spellbinders Long Classic Rectangles.  The smaller one was hand cut.  I'll probably go back and frame the windows to jazz it up a bit. 
 
They really are fun to make, give it a try!
 
Thanks for coming by!
 
Enjoy~~


Pink Painted Poppies

Good Morning!

This card will be entered into the Challenge at Altenew, From Places Abroad--France, Stamping Sensations, Flower Power, and Simon Says Monday, Make Your Own Background.


I decided to try my hand at water coloring again, but this time I do believe I love the outcome, phew!  I made some water colored paper in several light shades of green and a spot of light pink, then using PTI's Chevron Vertical Cover Plate die I created my background.   I softened that look by covering it all in a sheet of Vellum.  I then created some water color paper in different shades of pink and cut out my Poppies using the Painted Poppy sets from Altenew, then I stamped the flowers in Tuxedo Black ink.  These were placed on a plain panel of water color paper....which looked blah, so I made 3 flower masks and spritzed some green ink all over it....much better!


Then I began to have even more FUN!  I cut out 3 of the budding poppies and began painting them with inks and water....these are what I absolutely ADORE!  Love the colors and the way they blended one into another.  Added some Corner Punches and some fabulous pink Sheer Ribbon that came off of my Valentine Chocolates--c'mon you all do that too, right???

 
My absolute favorite part of this entire creation!  YUM!
 
Thanks for Poppy-ing by.....yeah that never gets old lol
 
Enjoy~~


Monday, March 7, 2016

Warm Spring Wishes

Hello!

This card will be entered into the Challenges at; Dies R Us, Shaped CardsSimon Says Wednesday, Touchy Feely, and ScrapyLand, Anything Goes!

 
I used Labels And Stitched Frames dies to cut the base of my shaped card.  The center flower is, Old Country Bloom, and the leaf flourish is, Branch With Leaves.  All dies are by Sizzix.

The sentiment and small stamped leaves are from Warm Spring Wishes by Gina K Designs.  Flower Button for accent and Swiss Dots Embossing Folder for some added texture.  I can't believe I did not use any Designer Papers, just plain card stock.....wow! 
 
Happy Spring!
 
Enjoy~~