Thursday, September 28, 2017

Wedding Shaker Card

Hello! 

It's been so long since I have posted just for fun or for a couple of Challenges.  But I find myself with some time and creativity to do just that!  YAY! 

This is a Wedding card that I made for an online BFF's son who will be marrying the love of his life in early November.  YAY for love!  I don't know them in person but I do know their colors are navy and shades of pink/rose/burgundy.....I think.....it's been a loooooong summer!

I will enter this into the Challenges at;  Simon Says Wednesday, Anything Goes, Simon Says Work It Wednesday, Favorite Stamps and Scrapy Land, Anything Goes


The front of the card uses 2 simple hearts.  Embossed in Black and White sparkly glitter powders.  They are from the PTI stamp set, Love & Marriage.  The Designer Paper is also by PTI, In Bloom.  


I topped each heart with sheer ribbon bows with pearl centers. 


The die cut heart border on the left as well as the hearts on the right are by Stampin' Up!, Love Notes.


I decided to add a Shaker Box on the inside of this card, I don't think I have ever done that before, it's pretty cool!  I hand cut a frame and backed it with Fun Foam.  My Bride and Groom are embossed in Black and White powders (why I did not use Navy I have no idea....grrrrr) they are from the Gina K Designs, I Do set.  I framed the Shaker in with a Poppystamps die, Dogwood Blossom Corner.   Bravo Burgundy ink.  Sheer Ribbon, Sequins, Beads, Glitter. 
 
This was FUN and has the feel of a little book. 
 
Just think Nancy, by the time you're a Mother In Law I should be a Nana! 
 
Thanks for popping in and showing some love!
 
Enjoy~~


Wednesday, September 27, 2017

Black Cat Slider

Good Morning!
Back again on the Tutti Designs Inspiration Blog.
 
Another spooky Halloween card to share with you today! 
 
This was a very FUN card to create!


I die cut this Black Cat die from Black Glitter paper.  I added some very thin Scor Tape to the back of this die cut to make sure the intricate detailed pieces in the cat's body actually stayed put.  I like this look as it adds texture and interest.  Then I was at a loss.....what to do with him? 
 
Oooh I know, make a slider card!  And that's what I did! 


I watched a few You Tube Videos to make this, hand cutting the slider channel which is hidden.  I was quite pleased with how easy it actually was to create.  The Black Cat just goes creeping along searching for his next prey, not even paying attention to the ravens in the trees or the bats below.
 
  Perhaps he is searching for YOU!  Eeeeeeeek!


On the inside I did want to show you how beautifully detailed this Black Cat really is.  Think about this, 2 looks for the price of one!  Pretty cool!
 
Eyelet and Ribbon for my pull tab and a Gina K Designs sentiment for the Wicked stamp set.
 
Spooky Good Fun!


Everyday you will find new and creative ideas right here, on the Tutti Designs Blog!

Need More?  Check out these Quick Links:


Each Wednesday I will be back to share some new and creative card making ideas with you all!

Enjoy~~


Wednesday, September 20, 2017

Tree With Lantern

Good Morning!
 
Moving into some Halloween FUN!  The new August Release has so many fabulous and spooky dies to create all things Halloween. 
 
Run right over to the Tutti Designs Store and check them out!  They are frighteningly good!  Mwahahahahaha


I found some crazy Halloween Designer Paper in my stash and I went from there.  I hand cut a tag to incorporate the size of this FUN Tree With Lantern die.  Layering it in Black and White card stock, sponging the edges to give it a more rustic flavor and feel.  The die was cut from Black Glitter paper and once again from Orange.  That sweet little Pumpkin Lantern was layered on to the Black.


Purple Rhinestones, Orange Baker's Twine, Orange Eyelet and some Nuvo Crystal Drops in Ebony for my accents.  I am not even bothered by that smeared drop, it's a Halloween card, something has to be wrong, right?


Everyday you will find new and creative ideas right here, on the Tutti Designs Blog!

Need More?  Check out these Quick Links:


Each Wednesday I will be back to share some new and creative card making ideas with you all!

Enjoy~~


Double D, Sentiment / Quote

Good Morning!

A brand new Challenge is up and running over at the Double D Challenge Blog. 

Check out this Inspirational Tile!


I used a couple of my favorite quotes on my card.  It was so hard to narrow them down, there are soooooo many wonderful and inspirational sentiments out there that just speak to me.


I used the Taylored Expressions stamp set, A Life She Loved....totally sums that up, aye?  Stamped in Raven Black ink and colored with Copic Markers.


No Designer Papers were harmed in the making of this card!  Wonky Panel Placement, bit of a paper Doily and a couple of Enamel Dots for accents, that's it. 


Let the sentiments shine through!


Please come on over to the Double D Blog and join in all of the FUN!  You'll be glad you did as there is always a pretty prize up for grabs!
 
Here is the FAB prize for the Sentiment / Quote Challenge, this wonderful booklet of Quotes And Words.


 Enjoy~~


Wednesday, September 13, 2017

Birdhouse Garden

Good Morning!
 
 
A little change of pace for me today.  This card showcases an oldie but a goodie Tutti Designs die, Birdhouse Garden, which was released back in the October Release of 2016.
 
I love this die, because it reminds me of putting my own gardens to bed for the upcoming season.  I adore Fall and all it brings, even if my pretty blooms go dormant for a while!


Once again I cut this beautiful Birdhouse Garden die from White card stock.  I colored it using Copic Markers.  I also added some Pink and White card stock to the back of the birdhouses and the pretty yellow flowers.  This technique gives a bit more oomph to your die cut.  Then I added Versa Mark ink to the entire die cut, coating in clear Embossing Powder and heating.  This always adds such a nice shine to what you are creating AND it makes your die cut look like a pretty embellishment.  If you do this with many layers it becomes an absolute gorgeous chipboard like piece......which as you all know, adds depth and dimension. 


As I only cut one layer, this is still a nice flat card for easy (no extra postage) mailing. 
Gotta love that!


Everyday you will find new and creative ideas right here, on the Tutti Designs Blog!

Need More?  Check out these Quick Links:


Each Wednesday I will be back to share some new and creative card making ideas with you all!

Enjoy~~


Wednesday, September 6, 2017

Pumpkin Frame

Good Morning!
Back on the Tutti Designs Inspiration Blog today.
 
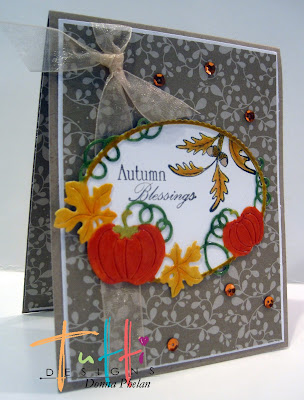
This card will be showcasing one of the new August Release dies, # 387 Pumpkin Frame
 
Fall is in the air people.....and I am thankful!


I die cut this beautiful Pumpkin Frame and colored it with Copic Markers.  Then I covered it with Versa Mark ink and Clear Embossing Powder.  Heated it to get that pretty shine.


Added a Fall stamped image and sentiment from the Gina K Designs set, Fanciful Fall.  Adhered it to my card panel adding Sheer Ribbon and Randomly tossed Sequins (wink, wink).  This completed my Autumn Blessings card.


The Tutti Designs Store has some beautiful and spooky
new additions to the August Release for all of your Fall and Halloween card making needs!
 
 
Everyday you will find new and creative ideas right here, on the Tutti Designs Blog!

Need More?  Check out these Quick Links:


Each Wednesday I will be back to share some new and creative card making ideas with you all!

Enjoy~~


Double D, Glitter

Good Morning!

A brand new Challenge is up and running over at the Double D Challenge Blog. 

Check out this Inspirational Tile!


All that Glitters is not gold.....sometimes it's PINK!!!


I started with a Spellbinders Captivating Squares die cut, which I doused with this beautiful Martha Stewart Glitter in Tourmaline....let me just say this color will come in super handy for making Christmas Ornaments for our little Penny-Poo!  :)  I added a Swiss Dots textured panel to the Spellbinders die cut, which makes for a lovely resting space for my glitter butterfly!


My butterfly is by Cheerylynn, Small Lace Butterfly.  I die cut the pretty image in White card stock and the backing from Adhesive Paper.  In this way I was able to layer the 2 pieces together and then sprinkle and burnish in my pretty glitters, I used; Amethyst, Kunzite and more of the Tourmaline.  The Adhesive Paper really holds onto the glitter....yay!
 
 
A few different angles so you can see all of that sparkle and shine!


I also popped up the butterfly for added dimension.


Sentiment stamped on a Vellum strip in Rose Red, and then Heat Embossed with Clear Powder, this helps with the smearing issue.  PTI, Happy For You stamp set.


Adhesive pearls and a little Heart Button for accents.
 
 
Please come on over to the Double D Blog and join in all of the FUN!  You'll be glad you did as there is always a pretty prize up for grabs!
 
Enjoy~~