Sunday, July 31, 2016

64th Anniversary

So many wonderful anniversaries coming up, not to mention that we just celebrated our 28th....Oooh he is a lucky man!  :)

I am working on several different ones, for relatives, clients and friends.  This first one is for my Aunt and Uncle, 64 years!  WOW!!!

 
Lots of dies and Gold Foiling with my Mini Minc used here.  The shine on that foil makes it difficult to get a true picture.  Spellbinders; A-2 Fancy Ribbon Threader, Perfectly Pierced Classic Frame, Hearts.  Papertrey Ink, Fabulous Frames die.  DieVersions, Celebrate Curly Word die.  Paper Smooches Foliage 2, which were cut from Toner Paper and Gold Foiled as well as the Paper Punched Hearts. 
 
64 from Gina K Designs, Simple Numbers stamp set, heat embossed in Gold.  Swiss Dots and Sizzix Love Birds Embossing Folders for texture.  Gold and Sheer Ribbons and Adhesive Pearls for accents.

 
This card will be entered into the following Challenges:
 
Simon Says Monday, Add Some Texture
Simon Says Wednesday, Anything Goes!
Scrapy Land, Emboss It (heat or dry)
 
Thanks for stopping by!
 
Enjoy~~


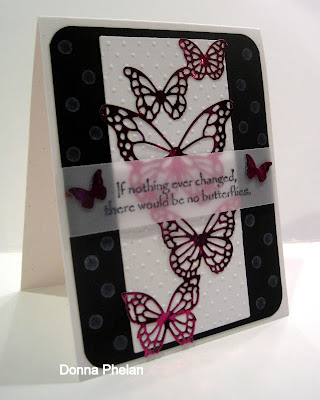
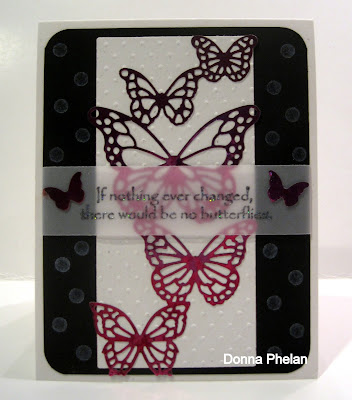
Butterflies And Change

Happy Sunday!
 
Back on the Dies R Us Blog.
 
 
My card uses the beautiful Butterfly Exhibit die set from Memory BoxThis particular die set was out of stock at the time of writing.....however you could easily use a number of butterfly die sets to create this look, here are 2 of my favorites;
 
Memory Box
Colette Butterfly Branch
 
 
Memory Box
Hovering Butterfly Frame
 
 
I am certain either of those would make stunning cards!


I die cut my butterflies from Toner Paper and then ran it through my Mini Minc Machine to add this gorgeous Hot Pink Foil.  It really picks up all of the delicate and intricate designs.  Adhered them on to a panel of white card stock with Swiss Dots Embossing texture.  Little circle dots stamped in Frost White ink. 

 
Sentiment by Gina K Designs, Take Flight was stamped on to a strip of Vellum using Marcasite Embossing Powder, a perfect match to my die cuts.  And those handy dandy little foiled butterflies are great for hiding the adhesive. 
 
This card will be entered into the Challenge at Simon Says Monday, Add Texture.


Don't forget to join in all of the fun at the Dies R Us Challenge Blog. There's a new challenge theme offered on the 1st & 15th of each month, with a gift voucher prize to one lucky winner.

And in case you were wondering, why YES we do have a  FB Page and PINTEREST Page.  Come check us out!


Friday, July 29, 2016

Winter Wonderland

Good Friday Morning!

Let's get right to it!

 
I used the Gina K Designs stamp sets, Let It Snow and Season's Greetings.  I knew I just had to make a Shaker Card!!!  Using Purple Embossing Powder I created my snowflake background.  This particular powder has glitter in it.....sooooo sparkly!  My shaker window was created using the Papertrey Ink Fabulous Frames die and Fun Foam.  The easiest way to make one by far!   The shaker is filled with purple and iridescent sequins and glitter in purples and whites.  FUN!  I added texture to the frame using the Snowflakes Embossing Folder by Darice. 


My snowman was colored with Copic Markers and fussy cut out.  I had this awesome purple glitter paper in my stash.  I die cut several of the Cheery Lynn Fanciful Flourishes and snipped them apart, adding the pieces everywhere.  It gives it a nice blustery feel and you hardly notice the leaves.  lol  I also die cut Winter Wonderland using Sizzix Holiday Words dies. (thanks Carol) 

 
Sakura Black Glaze Pen to accentuate the snowman's coal buttons, eyes, and smile.  Sheer White Ribbon.   On these hot summer days, I wish he would breathe down my neck hahaha
 
This Shaker Card will be entered into the following Challenges:
 
Stamp TV, Color Me, use a bit of coloring
Double D, Shades Of Purple
Scrapy Land, Emboss It (heat or dry)
Simon Says Monday, Add Some Texture
Simon Says Wednesday, Anything Goes!
Cheery Lynn, Christmas In July
 
Thanks for blowing in.....
 
Enjoy~~


Thursday, July 28, 2016

Beautiful Day Florals

Good Morning!

This card will be entered into the Challenges at Altenew, Weddings, Simon Says Wednesday, Anything Goes! and Simon Says Work It Wednesday, August Birthstone, Peridot.


I used the Altenew stamp and die sets, Beautiful Day.  For the large blossoms and leaves I only used one ink pad on each; Crushed Curry, Pink Pirouette and Wild Wasabi.  Each blossom was stamped 5 times, each one has 4 steps, then I did the 2nd outline in the opposite color.  You can see it more on the pink blossoms, outlined in yellow.  So, if you are limited on ink pads and shades, don't fret, you can still get all of the details by using only one color.


Flowers layered on to a Spellbinders Majestic Labels 25 die cut.  Enamel Dots and Corner Punch for accents.  Each flower center has been hi-lighted with a Sakura Black Glaze Pen.


I popped each flower up using fun foam.  The bottom pink one has been popped up using twice the thickness, I really wanted to show a lot of dimension on this card.  A leaf and cluster of flowers are adhered to the card base too to show more depth.
 
Thanks so much for stopping by!
 
Enjoy~~


Wednesday, July 27, 2016

Wishing You.....

I am entering this creation into the Challenge at Power Poppy, B Happy and Simon Says Wednesday, Anything Goes!

B is for; Book, Bouquet, Bling and/or Blossoms.

 
I used the Power Poppy stamp set, Short Stacks.    Images colored with Copic Markers.   I created a double layered tag using the MFT Cross Stitched Tags die (I may even put this on a card base).  Designer Papers by Nicole, Oh Blooming!

I added strips of Washi Tape around the smaller tag to create a pretty pink striped border.  Eyelet, Gingham Ribbon, Lacy Ribbon, Heart Button and Jute Twine for accents.  Wink Of Stella Clear Pen and Sakura Glitter Pens in Clear and Yellow for some shimmer and shine.  
 
 
Cheery Lynn Cherry Blossoms die, Adhesive Pearls for centers.
 
You know I love making tags and this was just FUN to put together!
 
Thanks so much for stopping by, love it when you do!
 
Enjoy~~


Monday, July 25, 2016

Papertrey Ink July 2016 Blog Hop

Playing along again in the Papertrey Ink Blog Hop.


This card will also be entered into the Challenges at Simon Says Monday, Add Some Texture and Scrapyland, Emboss It (heat or dry)


I used the Hexagon Cover Plate and Counting My Blessings dies from Papertrey Ink.  I layered the thankful teal on black, so it pops a bit more.  Swiss Dots Embossing Folder on inside grey strip for texture. 


The image is colored with Copic Markers and is by Penny Black, Blooming Gardens.  MFT Cross Stitched Tags die set.  Crystal Drops in Ebony and Black and White Gingham Ribbon as accents. 
 
I stamped the poppy petals twice and fussy cut one out.  Using 3D dots I popped them up to add some dimension.   


I also added some Yellow Stickles to the poppies.

Thanks for Poppy-ing in...hahaha that never gets old!

Enjoy~~

Dogwood Blossoms

Good Monday Morning!
 
 
Back on the Dies R Us Blog today!


To create this card I first die cut my beautiful Dogwood Blossom Corner by Poppy Stamps.  Twice. 
 
 
I cut 2 complete sets in white card stock and then a bunch of blossoms in light pink.

 
I then colored the vines and flowers using Copic Markers.

 
Then I simply layered the light pink blossoms over the colored ones.  I off set them a bit to add a bit of dimension to the flowers. 
 
 
Here I die cut my Birds by Impression Obsession also in white card stock.

 
This way I could color them how I wanted with Copic Markers.
 
 
Using Spellbinders Fanciful Lattice and Perfectly Pierced Frames I created my background layer and sentiment label.  Sentiment stamped in Black Licorice ink by Gina K Designs, You Are Not Alone.  Nuvo Crystal Drops in Dandelion Yellow for accents.  Swiss Dots Embossing Folder for texture.
 
This card will be entered into the Challenges at Simon Says Wednesday, Things With Wings and Scrapy Land, Embossing (heat or dry).


Don't forget to join in all of the fun at the Dies R Us Challenge Blog. There's a new challenge theme offered on the 1st & 15th of each month, with a gift voucher prize to one lucky winner.

And in case you were wondering, why YES we do have a  FB Page and PINTEREST Page.  Come check us out!


Sunday, July 24, 2016

Season's Greetings

Yup, it's time.....Christmas in July!

This card will be entered into the Challenges at Stamp TV, Christmas In July, Scrapy Land, Emboss It (heat or dry) and WOW! Embossing Powder.

 
I created a Christmas card with a matching envelope.  This card measures 5.5" x 5.5" and the envelope measures 6" x 6.25" to accommodate my sentiment tab.  I used the Gina K Designs stamp set, Season's Greetings.  The sentiment is heat embossed with White Embossing Powder.


Designer Papers by DCWV, Brights.  Using Spellbinders Standard Circles dies I created a frame by layering 2 together.  This created a nice 'wreath' base to adhere my white foliage to.  Paper Smooches Foliage 1 and 2 dies used.  I topped my wreath with Candy Dots by Stampin' Up! and green foliage and red jingle bells (which were tied on using twine).  Gingham Ribbon, Button and Jute Twine for accents.
 
 
My wreath is backed by a piece of frosted Vellum.
 
Thanks for coming by and Fa La La La La.....
 
Enjoy~~


Monday, July 18, 2016

Cape Cod Views

Good Monday Morning!
 
I am on the Dies R Us Blog today!

I have created a couple of cards to share with you today, they feature the Large Madison Window die set by Poppy Stamps.  Unfortunately this particular die set is no longer available.....however you could easily substitute the Small Madison Window also by Poppy Stamps.  The die is just a tad smaller, but the outcome would be the same.
 
 
This is the inside view I created.  It simply uses the Window Die.  I created my beadboard by scoring every 1/4 inch using my Scor Pal.  A simple 1/2 inch strip of card stock to create my chair rail.  Anchor 'wallpaper' border, sentiment and anchor all stamped in Pacific Point ink by Reverse Confetti, Happy Harbor.  Lighthouse image by Gina K Designs, By The Sea colored with Copic markers.  Stickles added to create the 'light'.   


Here I have created my outside look.  This time I used the window, shutter, window box and foliage dies.  Which are all also included in the Small Madison Window die set.  I created my clapboards by scoring every 1/4 inch using my Scor Pal, this time horizontally. You can see a peek of the artwork hanging on the wall inside.  I filled my window box with starfish and sand dollars from an old Cuttlebug die I had in my stash.  BUT there are still many dies to choose from in the Dies R Us Store. 
 
Here are two of my favorites: 
 
Impression Obsession
Mini Shell Set
 
Trimcraft
Beach


Just another Cape Cod View.

These cards will also be entered in the Challenge at Simon Says Wednesday, Create A Scene.
 

Don't forget to join in all of the fun at the Dies R Us Challenge Blog. There's a new challenge theme offered on the 1st & 15th of each month, with a gift voucher prize to one lucky winner.
And in case you were wondering, why YES we do have a  FB Page and PINTEREST Page.  Come check us out!


Sunday, July 17, 2016

Nothin' Fancy, Simply Sweet

Oh it's a muggy one today!  Hope you're all staying cool wherever you may be!

This card will be entered into the following Challenges;  Stamp TV, Just One and Simon Says Monday, Flora And Fauna.

 
I used this sweet little flower image from the True Love stamp set by Gina K Designs.  I colored it with Copic Markers and then using Versa Mark Ink, Heat And Stick Powder and Dazzling Diamonds Glitter I added my sparkle.  The Heat And Stick Powder is heated twice, once to stick the glitter on and once to seal it so it stays on!  Black Licorice Ink.

 
MFT Cross Stitched Rectangles die and a Sunshine die by Simon Says Stamp, which I layered in green and yellow card stock, offsetting a bit.  Green and White Gingham Ribbon.


We all know how hard it is to capture the sparkle in a photo, here's the best angle.

Thanks for stopping by.....I fear it may be a 3 shower kind of day lol

Enjoy~~

Thursday, July 14, 2016

Thought Of You Today

And Smiled.

This card will be entered into the Challenges at Papertrey Ink, Create Along With Us and Simon Says Monday, Flora And Fauna.

 
There were so many beautiful cards from this Release to choose from, but I totally fell in LOVE with Dawn McVey's card.....isn't it just lovely?
 
 
And here's what I came up with:
 
 
The large flowers and leaves are from PTI's Vintage Linens, stamp and die sets.  I die cut water color paper and using my inks I 'water colored' them.  Sentiment is also by PTI, Happy For You.  The smaller blue flowers are from Altenew, Beautiful Day stamp and die sets.


MFT Dotted Scallop Border die, which I cut and tucked beneath my Designer Polka Dot Paper.  Black Licorice Hybrid Ink.

Thanks for coming by, appreciate it when you do!

Enjoy~~

Wednesday, July 13, 2016

Distress Ink Lifting

Happy Wednesday!

I'm hosting this week's Challenge at Mod Squad Blog.  Hope you'll find some time to join in.  Grab some coffee this may take a while to explain.  :)

Challenge

This week's Challenge is, Distress Ink Lifting! 

Distress Ink + Water = Magic!

Here's the VIDEO from Jen McGuire.  This is where I fell in love with this technique.

This Weeks Sponsor is CAS-ual Fridays Stamps

http://cas-ualfridaysstamps.com/


All the stamps and Fri-Dies are designed by Michele , and are based on her love for Clean And Simple design, hence the CAS in CAS-ual. However, they will delight any stamper's style! Whether you are a CAS enthusiast or a lover of Utterly Adorable Layers, you will have a blast getting inky with them. 

The stamps are made in the USA of the finest clear photopolymer, and the coordinating line of wafer thin dies are also made in the USA.

 
2 Prizes

2 - $15 Gift Certificate each to the STORE

My 1st Samples

 
I used the beautiful stamp set, Mon Ami and the matching die set, Mon Ami Fleur
 
 
I began swiping my Distress Inks in; Spiced Marmalade, Broken China and Peeled Paint over some textured water color paper.  Using a water brush I blended the colors together a bit.

 
Using these awesome dies I cut out the pretty flowers.

 
Using the co-ordinating stamps, Versa Mark ink and White Embossing Powder I heat set the images.  Then I began to "paint" them with water.  When you add water to Distress Inks it moves and lifts the color, creating a new look.

 
If you look closely, you will notice the lighter shades of colors on the tips of the petals.
 
 
How FUN is using these fancy sentiments as the stalks to my flowers?  I think they look fantastic!!!  My grass was created by using a small leaf stamp from this set.  Stamped in Black Licorice ink, off the edge of the paper, and colored with Copic Markers.
 
My 2nd Card


For this card I added several of the larger sentiments and one of my favorite little techniques for creating interest, paint splattering.


This card was created in the same manner, swiping Fired Brick Distress Ink all over my water color paper, and embossing in black.

 
No need to die cut this panel out as I decided to do the Peek A Boo technique we spotlighted in last month's Challenge.  The image is layered beneath the die cut.  I added depth and dimension using fun foam as a backing.


Here you can see the depth.


This flower I did not "paint"  I just added drops of water to the image with my brush.  It's a fun look! 
 
These cards will also be entered into the Challenge at Simon Says Monday, Flora And Fauna.
 
Head on over to the Mod Squad Blog and join in all the FUN!!!
 
See you there! 
 
Enjoy~~