Monday, May 16, 2016

Wooden Celebration Tote

Good Monday Morning! 
 
Back again, on the Dies R Us Blog!  This time I would like to share a little project with you.
 
I found this sweet little wooden tote at my local craft store for $1.  I knew with a little Designer Paper and some wonderful dies from the Dies R Us Store I could transform it into something fabulous.  I think I was right!
 
 
First I painted it all white and covered it in pretty pink and white Designer Paper, wrapped a pink pleated ribbon around the top and added white sparkling glitter to the handle......and then the FUN began.  I sorted out a bunch of dies I wanted to use and started cutting.  

 
I started with this sweet little Picket Fence by Amy Design and moved right on to the Curly Words Celebrate by Die-Versions.  Let me just tell you how impressed I am with this wordy die.  It's fancy and delicate and perfect for....well for ANY celebration!  Here I layered a pink and white cut together so it would POP and add a bit of dimension. 


Next came some beautiful flowers....now I know what you're thinking....aren't those Poinsettias???  Well yes, yes they are....BUT aren't they gorgeous???  This is the Small Poinsettia Set die from Impression Obsession.  I ADORE it and think it looks just lovely as 'an everyday flower'.  Plus this is for my 86 year old Mother......she'll love it.....wink, wink!  I die cut several out of a deep pink and light pink card stock and some beautiful Vellum.  Layered them together by size, not alternating from large to smallest.  Then I added some pearls for their centers. 

 
Next up came some of my beautiful foliage.  In the 1st photo you will see the fantastic Ivy Corner Flourish by Cheery Lynn.  I also used the Foliage 1 die from Paper Smooches. 

 
And for my final selection, I created a beautiful butterfly.  Butterfly #2 Set from our very own line Dies R Us Dies.  This set is awesome as it has five....that's FIVE different butterflies included.  I layered 3 different ones together in the deep pink and light pink card stock and topped with a Vellum one.  WOW!
 
 
A perfect little garden tote.  I'm not sure what I will put in it as yet, probably something chocolatey.

I will be entering this into the Challenge at Simon Says Wednesday, Flowers.
 
Here's what I used:

 
Amy Design Picket Fence


DieVersions Curly Word Celebrate


Impression Obsession Poinsettia Set Small
 
Cheery Lynn Ivy Foliage Flourish
 
Paper Smooches Foliage 1
 
Dies R Us Butterfly #2 Set

Thanks so much for stopping by!

Enjoy~~

 
Follow Dies R Us!
click below for:
STORE
CHALLENGE BLOG
FACEBOOK
INSPIRATION BLOG


Saturday, May 14, 2016

Pretty Yellow Poppies

Good afternoon.....still having some Internet issues....grrrr....

Spent about 4.5 hours out in the gardens today, YAY!  I even started some seeds and Poppies were among them!  Fingers crossed!

Today's card will be entered into the Challenges at Altenew, Australia, Photo Inspiration, Simon Says Monday, Emboss It, Simon Says Wednesday, Flowers and WOW! Embossing Powder.


I used the stamp and die sets from Altenew, Painted Poppy....I can't get enough of these sets!  Images water colored with Stampin' Up! inks.  I also added a bit of Yellow Stickles to the flowers and a bit of Sakura Glaze Pen to the centers.  

 
I backed one poppy, the top one, with Fun Foam to add dimension.  I tied the Jute Twine around all 3 stems.  The tag was made by using a Spellbinders Tags And Labels die.  The sentiment is by Simon Says, Summer Garden and is heat embossed in black. 
 
I adore these flowers!  Whether in the gardens or in the craft room I always have dirt or ink under my fingernails.....it is a glamorous life I live!  :)
 
Thanks for poppy-ing in!
 
Enjoy~~


Friday, May 13, 2016

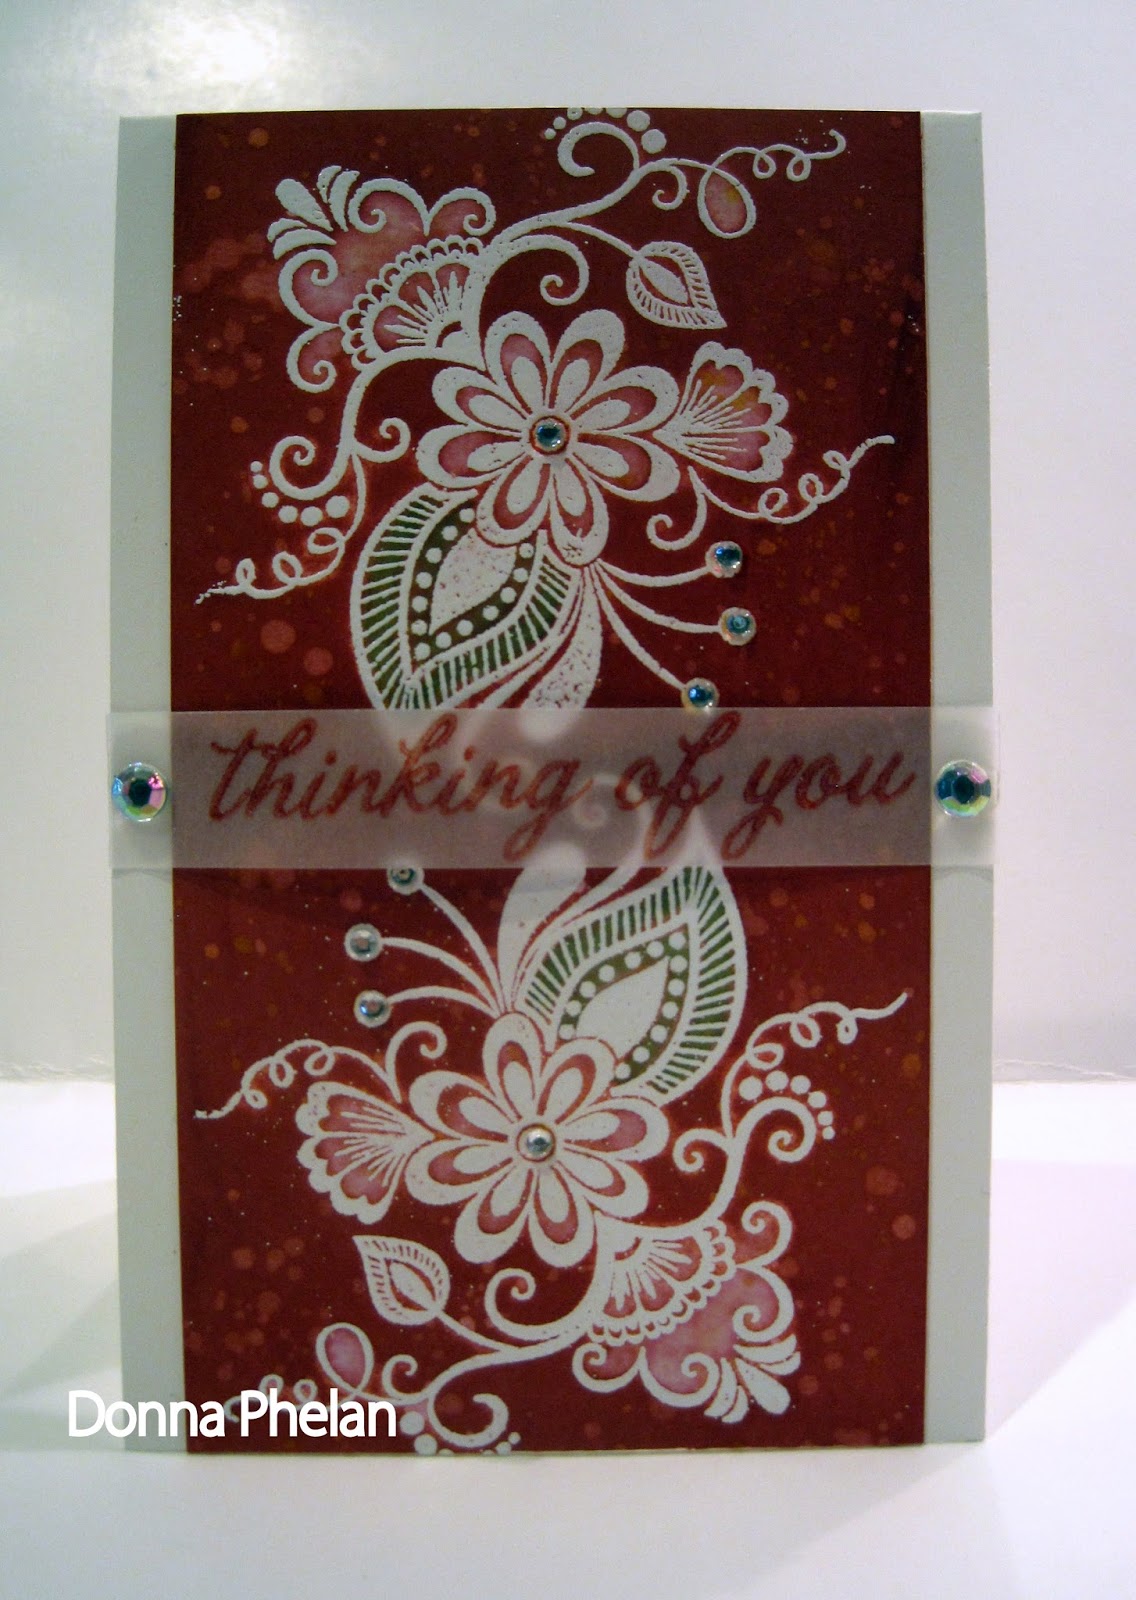
Thinking Of You

Good afternoon!  Man the Internet Gremlins are acting up.....it's driving me crazy!

Today's card will be entered into the following Challenges; Hero Arts, Tone On Tone, WOW! Embossing Powder. Simon Says Monday, Emboss It and Simon Says Wednesday, Flowers.

 
I used the Gina K Designs set from the Stamp Of Approval Box, Beautiful World.  I Stamped this image twice with Versa Mark ink and White Embossing Powder.  It is stunning when heated!  I then sponged Fired Brick Distress ink all over the panel.  Using my water brush I began 'lifting' some of the ink off just by 'painting'  This is a fabulous technique, Jen McGuire has an awesome video HERE.  I also splattered a bit of water all over the card, which also lifts the ink, to add some interest.  Added a bit of Peeled Paint Distress ink to the large leaves. 


Sentiment from the Hero Arts set, Everyday Sayings.  This was stamped in Fired Brick ink and covered in Clear Embossing Powder, it really POPS especially against the Vellum background.  A few small and large Rhinestones for accents. 

Thanks for popping in!

Enjoy~~ 


Thursday, May 12, 2016

Happy Wishes

Good Morning! 

If you happen to be out and about today and see my Mom, don't forget to wish her a Happy 86th Birthday!  Isn't that the best???

My card will be entered into the Challenges at CAS-ual Fridays, Birthday Girl and at Simon Says Wednesday, Flowers.

 
I used the CAS-ual Fridays Stamps set Wonderful Words to create my card.  I masked off the sentiment and chose to use just the words not the large ampersand that is also on the stamp.  One stamped flower colored with Copic Markers.  The other flower I made into a chipboard accent.  Stamped the image on to Designer Paper and die cut it out using a Spellbinders Standard Circle die.  I also die cut 3 more circles out of thick heavy duty card stock, it may be #140, then I glued them all together and topped it with the stamped flower. 

 
Created a small tag using a Sizzix Tags And Labels die.  Added Jute Twine and my chipboard accent as well as 2 enamel dots for accents and a wee bit of the Designer Paper.  Black and White Gingham ribbon.  A thin black ribbon to the left, covering the different designs on the paper. This is a double sided piece of Designer Paper, that small polka dot print is on the other side.  This side shows you the 2 prints together, the polka dot is just a strip along the paper so you can see the 2 together, but I love how it looks against the flourish print so I used it.  Adhesive pearl flourish and several smaller ones and my card was complete.  If you look at the piece of Designer Paper I used as an inside accent, you will l see I did the same thing, using the side with both prints.  Cute!
 
Thanks for stopping by.....we have cake!!!
 
Enjoy~~


Wednesday, May 11, 2016

Retiform Technique

Happy Wednesday! 

I am hosting this week's Challenge over at the Mod Squad Blog.

Now don't be scared by the title.....give it a try, I think you'll find you LOVE it!

Challenge

Retiform Challenge 

Retiform:  :  composed of crossing lines and interstices :

This is achieved by placing down paper (copy paper / post-it-notes) and then sponging ink on to different sections of the card stock, moving the paper as you go, to create colorful little sections.

This Weeks Sponsor is CAS-ual Fridays Stamps
http://cas-ualfridaysstamps.com/

All the stamps and Fri-Dies are designed by Michele , and are based on her love for Clean And Simple design, hence the CAS in CAS-ual. However, they will delight any stamper's style! Whether you are a CAS enthusiast or a lover of Utterly Adorable Layers, you will have a blast getting inky with them. 

The stamps are made in the USA of the finest clear photopolymer, and the coordinating line of wafer thin dies are also made in the USA.

 
2 Prizes

2 - $15 Gift Certificate each to the STORE


Using inks in Wild Wasabi and Tempting Turquoise I created my retiform lines.  This technique makes little 'windows' of color, perfect for stamping and showcasing images and words. The stamp set is Wonderful Words.  Stamping in Black Licorice ink I just filled in all of the lovely little windows.  Sheer Ribbon for accent.


This time using Distress inks in Antique Linen, Peeled Paint and Wild Honey I created my retiform lines.  I used several stamp sets for this card; Casual Comfort, Girlfriend and 3 In A Row.  Inside I used the heart die from  Tic-Tac-Toe.  All images and sentiments stamped in Black Licorice ink.  A little Black and White Gingham Ribbon threaded through a Spellbinders Ribbon Buckle die for accent.

Don't be afraid to try new things....as we used to say to the kids when they were little, take a 'no-thank you bite'.  Try it once and if you don't like it just say, no thank you! 


Wonderful Words


Casual Comfort

 
Girlfriend


3 In A Row


Tic Tac Toe


So head on over to the Mod Squad Blog and check out all of the details! 

Thanks for stopping by!

Enjoy~~


Tuesday, May 10, 2016

Birthday Butterflies

Good afternoon!  We have had sunshine ALL day!  It is a miracle!

My card will be entered into the Challenges at Papertrey Ink, Ink Blending Through Die Cut Masks and Simon Says Wednesday, Stencil.

 
I created the mask, a stencil if you will, using a butterfly die from Dies R Us, Butterfly #2 set.  Cut it out of Vellum as Lizzie did in this VIDEO.   I used the Papertrey Ink stamp and die sets, Swoosh.


Inks in; Pink Pirouette, Pool Party, So Saffron, Soft Sky and Wisteria Wonder.  I love the soft tones sponging the ink colors achieves, it is so pretty!  I colored the small adhesive pearls with Copic Markers to coordinate with the colors of each butterfly. 

This card measures 3.5 x 5.5 inches.

Thanks so much for fluttering by.

Enjoy~~


Tender Prayers

Good Morning!

Today's card will be entered into the Challenges at Power Poppy, May Flowers, Simon Says Monday, Emboss It and WOW! Embossing Powder.

 
I used the Power Poppy stamp set, Short Stacks and colored with Copic Markers.  Sentiment is from Flourishes, Anemones and is heat embossed.  Designer Papers by Craft Smith, Tea Party and DCWV, Glitter Basics. 
 
My pretty little May Flowers are dies from Cheery Lynn, Gardenia (small strip).  The fern cuts are by Paper Smooches, Foliage 2 and the Cross Stitched Rectangles dies are from MFT.  Vellum layers and banner flag (hand cut) for sentiment, Enamel Dots and Sakura Glaze Pen and Wink Of Stella Clear for accents.  Adhesive Pearls for flower centers.
 
Hopefully this card will bring some comfort to a family who has lost a dear one.
 
Enjoy~~