Monday, June 27, 2016

Layered Butterfly

Good Monday Morning! 
 
Back on the Dies R Us Blog again, to share another butterfly card with you.
 
 
I die cut the Small Lace Butterfly With Angel Wing die, by Cheery Lynn out of Core'dinations Glamorous Glitter Paper.  Man, is this butterfly gorgeous.....and it is anything but small.  It measures 2  3/8 x 3  3/4.  BIG.  BOLD.  BEAUTIFUL.  The lacy details are remarkable!  I also used the Angel Wing die.  This thing is so clever!  It's really only 'half' a die.  Which cuts down on your cost, what's not to love about that!!!
 
 
You just fold your card stock in half and line the end of the die up to the fold line, cut and wha la, a beautiful full sized die cut butterfly to back on to your beautiful full sized lacy butterfly die cut.  CLEVER!!!
 
After layering my lacy butterfly cuts I thought it would be interesting to cut another, totally different shaped butterfly from some Designer Paper, and layer that on top!  I cut one butterfly from the Butterfly Set #2 by our very own product line, Dies R Us Dies, from a very thick card stock that I have in my stash and then Designer Paper, adhering the 2.  This made a nice sturdy chipboard-like accent.  What do you think?  Kind of different, kind of interesting?  Kind of? 

 
Texture added to my Blue Raspberry card stock using a Darice Lace Doily Embossing Folder.  I also added an actual doily to place my butterfly centerpiece on.  Beneath the doily I die cut a Spellbinders Standard Circle out of Fun Foam.  This gives the card a bit more dimension and makes for a nice sturdy resting spot for my butterfly.  I decorated all around with the Dogwood Blossom Corner die by Poppy Stamps, cutting several and snipping apart, placing them where I needed them. 


Lastly I added lot of adhesive pearls in different sizes, including one as a flourish, to show the flight of my butterfly.  A strip of Designer paper on the inside to finish the card off.  I very rarely add an inside sentiment, preferring to write a heartfelt note.
 
Here's what I used:
 
Small Lace Butterfly With Angel Wing
Cheery Lynn


Butterfly Set # 2
Dies R Us


Dogwood Blossom Corner
Poppy Stamps


Thanks so much for fluttering by!
 
Enjoy~~


Sunday, June 26, 2016

Sweet Birthday

Good Morning!

This card will be entered into the Challenges at; Simon Says Monday, Patterned Paper and Simon Says Wednesday, Add Some Shine.

 
Using the Papertey Ink Jar And Lid die set, I created my jar to hold my strawberries.  Images and sentiment from Gina K Designs, Sweet Strawberries and Enjoy The Sunshine stamp sets.  Copic Markers for coloring.  My shine comes from the Glitter Designer Paper (the green strip) by DCWV, Glitter Basics.  

 
 MFT Cross Stitched Rectangles die for sentiment.  Swiss Dots Embossing Folder and heart Designer Paper, I thought both would mimic the strawberry seeds, which were hi-lighted using a Black Sakura Glaze Pen.  Red and White Gingham Ribbon, Green Button and Doily for accents.  Inks in Real Red and Black Licorice.
 
May all of your summer days be sweet!
 
Thanks for stopping by!
 
Enjoy~~ 


Saturday, June 25, 2016

Papertrey Ink June 2016 Blog Hop

Hello....once again hopping along at the Papertrey Ink Blog Hop!


This card will be entered into the Challenges at Papertrey Ink, Blog Hop and Simon Says Wednesday, Add Some Shimmer and WOW! Embossing Powder

 
This piece of artwork is titled Reef.  I totally went for the sea-like vibe.

 
I used Fired Brick Distress Ink and Stampin' Up! Inks in Melon Mambo and Tempting Turquoise to create my background. I just smeared them all around using a swiping motion and a water brush.  Then using Versa Mark Ink, White Embossing Powder and stamps from Papertrey Ink's Daydreamer and Flower Favorites sets I stamped my background.  Then I decided, hey why not make a Shaker card....so I did!  lol  

 
Using Spellbinder's Standard Circles I created my frame.  I always use this method for making my Shaker cards, it's so easy and Heather shows you exactly how to make them in this VIDEO.  A little Fun Foam, Scor Tape and Plastic Packaging is all you need.  I have added seed beads, glitter and sequins to make everything sparkle and shine!  I also added Wink Of Stella White Glitter Pen to all of the white embossing.....still quite difficult to see.  Grrrrr.......


Thought I would add this fun little die cut by Simon Says, Smile Circle, so cute!
 
Thanks for swimming by.
 
Enjoy~~

Friday, June 24, 2016

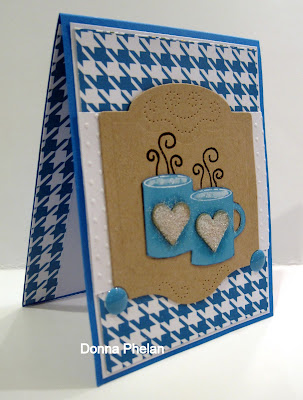
mmmmm coffee

One of my most favorite beverages....evaaaaah!

This card will be entered into the Challenges at; Stamp TV, Coffee, Tea, Sweets, Oh My!, Simon Says Monday, Patterned Paper and Simon Says Wednesday, Add Some Shimmer.

 
I used the coffee/cocoa mugs from the Gina K Designs stamp set, Season's Greetings, which were fussy cut out.  They do have snowflakes on the front of them, but I colored them over using a Copic Marker.  Then using Spellbinder's Hearts dies I layered heart die cuts in Kraft card stock over them.  Adding my shimmer to the hearts using extra fine Martha Stewart Glitter.  Talk about sparkle, shimmer and shine....wow!  I also stamped the mugs on the Kraft card stock, die cut using Spellbinders Perfectly Pierced Classic Frames,  and then traced the steam using a Sakura Black Glaze Pen.


Pretty teal Designer Paper.  Swiss Dots Embossing Folder for texture.  Wink Of Stella White Pen added to the 'coffee' for a bit more shimmer.  Enamel Dots. 
 
Quick.  Easy. Card.
 
Thanks for coming by.....the coffee is always hot!
 
Enjoy~~


Hello Stencil

Hello!

This card will be entered into the following Challenges; Papertrey Ink, Reverse Stenciling, WOW! Embossing Powder, Simon Says Monday, Patterned Paper and Simon Says Wednesday, Add Some Shimmer.

 
Here's Betsy's VIDEO so you can try this technique too!  I used a stencil I found in a long lost stash of them, kind of all flourishy.  Inks in Wisteria Wonder and Melon Mambo.  Papertrey Ink's Swoosh stamp set used, heat embossed in Black on to a Vellum strip.

 
Designer Paper layered on to lilac card stock using MFT's Bracket Edge Duo dies.  Pink Rhinestones for accent and Wink Of Stella Clear Pen for shimmer.....which is super difficult to see.  No matter what angle I photographed it.


I did paint the WOS on to each little flourish swirl.  Totally sparkles in real life.
 
Thanks for popping by.
 
Enjoy~~


Monday, June 20, 2016

Yellow Crocus

Hello!

Today's card will be entered into the Challenges at Simon Says Monday, Patterned Paper and Simon Says Wednesday, Animal Magic.

 
Technically there are still a few hours left of Spring, hence my crocus card.  Summer arrives at 6:34 p.m.  :)   I used the Gina K Designs stamp sets; Signs Of Spring and Stately Flowers 8.  Images colored with Copic Markers.  MFT Bracket Edge Duo die and an EK Success Butterfly Trio punch--layered in blue and green card stock and Vellum.  Sentiment stamped in Black Licorice Hybrid ink. 

 
Sheer Yellow Organdy Ribbon, Adhesive Rhinestones in Yellow and Turquoise for accents.  Swiss Dots Embossing Folder.  Vellum.  Wink Of Stella Clear Pen.
 
Just a fun card to color and make. 
 
Thanks so much for coming by!
 
Happy Summer Solstice.....almost.....enjoy the longest day of the year.  And if you want to know more about the Solstice Read Here.
 
Enjoy~~  


Butterflies

Good Monday Morning! 
 
On the Dies R Us Blog today to show you a quick and easy card using only ONE die set. 
When buying dies I always look for the biggest bang for my buck!  And this fantastic set from our very own product line, Dies R Us Dies, fits the bill! 
 
Only using the Butterfly Set #2  I was able to create this pretty little card!
 
 
The set contains 5 different butterfly dies.....FIVE!!!  Now that's A LOT of bang for my buck!  I die cut 4 of the different butterflies in 4 different black and white Designer Papers.  In white card stock, the base panel, I cut the same butterfly dies (saving for a future project).  I layered the white over a pretty pink card stock, which I sent through a Swiss Dots Embossing Folder.  This just adds a bit more interest and texture.  Then I lined up my pretty Designer Paper butterflies accordingly, to match up to the pink silhouettes.

 
My sentiment from Gina K Designs, Master Butterfly, was stamped in Black Licorice Hybrid ink on to a Vellum strip, which has been layered twice, so you can actually read it, but allows you to still see the pretty butterflies beneath.  The inside bottom left corner is an inlaid pink butterfly die cut.  This just finishes off the card nicely while still leaving plenty of room for a handwritten note.  4 pink Sequins as accents.
 
Cute.
 
Simple.
 
Easy.
 
I will also be entering this card in the Challenge at Simon Says Wednesday, Animal Magic.
 
Here's the one and only die set I used!
 
Butterfly Set #2
Dies R Us
 
Thanks so much for stopping by!
 
Enjoy~~


Sunday, June 19, 2016

Sizzlin' Summer Shaker

Hello!

This card will be entered into the Challenges at Cheery Lynn, Sizzlin' Summer Colors and Stamp TV, Shake, Shake, Shake.

 
Stamping the floral frame, twice, from the Dogwood And Butterfly stamp set by Gina K Designs, I then fussy cut out the flowers.  Images colored with Copic Markers.  Creating my frame by layering two Spellbinders Classic Ovals (Large and Small).

 
Cheery Lynn Ivy Corner Flourish, snipped apart.  Sequins and Glitter in green and orange and yellow fill my shaker window.  Nuvo Crystals in Red Berry (flower centers) and Dandelion Yellow for accents.  I find Shaker cards just so much FUN to make!
 
Thanks for stopping by.
 
Enjoy~~


Saturday, June 18, 2016

Sending You Sunshine

 
Good Morning! 
 
I am playing along in the Papertrey Ink Challenge, Create Along With Us.


I totally fell in love with Kay Miller's creation using Forget Me Nots.


Here is my interpretation:

 
I used a Spellbinders Fanciful Lattice die to create my card base, scored in half.  Perfect for a note card size.  Antique Linen and Calypso Coral inks.  Sentiment stamped in Black Licorice Hybrid ink.  I stamped off once for the flowers to give them a softer look.


Papertrey Ink Daydreamer and Simple Sunflower stamp and die sets used.  Frame was created by layering two Cross Stitched Rectangles by MFT.  Simon Says Sunshine die.   Iridescent sequins for accents.  It's kind of a sweet little note card.
 
Thanks for stopping by.....hope you have sunshine at your house!  We do and I will be in the gardens all day soaking it up!
 
Enjoy~~ 


Monday, June 13, 2016

Happy Birthday Masculine

Hello!

Taking another crack at a masculine card.  I must admit, I kind of love this one!

This will be entered into the Challenge at Simon Says Wednesday, Father's Day / For A Guy.


Swiping Distress Inks in; Broken China, Peeled Paint and Spiced Marmalade, I laid down my colorful background.  Then using a water color brush I dropped water all over the inks.  LOVE the way it looks after doing this!  A perfect below sea look, I think!  The stamp set is By The Tide by Stampin' Up!.  Using White Glitter Embossing Powder and Versa Mark ink I stamped my 'coral', which was then heated.

 
My fish were stamped and fussy cut out, colored with Copic Markers and then I added some Yellow Stickles on their scales.  The lower one is popped up for dimension.  The sentiment is from Gina K Designs, Lots Of Lines.  White Enamel Dots for accents, which also mimic the bubbles.
 
Who knew masculine cards could be FUN to make?!?!
 
Thanks for swimming by!
 
Enjoy~~


Sunday, June 12, 2016

Thinking Of You Masculine

Good Morning!

I have always struggled with masculine cards, so I am challenging myself to try and make more of them....sigh.....here goes nothing!

This card will be entered into the Challenges at Stamp TV, Scoring and Simon Says Wednesday, Father's Day / For A Guy.

 
The pelican and grass images are from Gina K Designs, By The Sea stamp set illustrated by Theresa Momber.  I created my wood grain background by scoring lines every 1/2 inch on grey card stock.  Then taking inks in Antique Linen and Wild Honey I swiped the card stock back and forth until I achieved a look I liked.  Super easy!  Image colored with Copic Markers.

 
The 'polaroid frame' is by Papertrey Ink, Fabulous FramesBlack Licorice Hybrid and Old Olive inks.  Cloud 9 Paper Clip and Stampin' Up! Candy Dots for accents.
 
Its clean.....it's simple.....like most men.....but without the clean.  LOL  I am only kidding!!!
 
Thanks so much for stopping by, appreciate it when you do!
 
Enjoy~~


Hydrangea Keepsake Box

Good Sunday Morning! 
 
Back on the Dies R Us Blog with another little project I would like to share with you.
 
I found this sweet little paper box at my local craft store for a $1.  Nice!!!
 
 
And now time for the transformation!
 

I first painted the box in lavender craft paint, then covered the bottom portion with some Designer Paper.  Cutting the Hydrangea set from Impression Obsession out of water color paper, I water colored the pretty little petals, stem and leaves.  Gluing my stem and leaves first, then the larger petals, topping with the smaller ones, filling in any gaps as I went.  I also added a bit of Wink Of Stella Clear Pen for sparkle.


Die cutting the Picket Fence by Amy Design several times I was able to line it up perfectly around the box using the posts as guides.  Adding leaves from  Foliage 1 by Paper Smooches I created my green vines.  Of course I had to add some beautiful butterflies, what garden isn't complete without them?  Butterfly Set #2  from our very own product line Dies R Us were the perfect topping!  I cut one shape from purple card stock and another shape from Vellum, layering the two.


I topped my Hydrangea Petals with Liquid Pearls in Buttercup Yellow.  My Butterflies are topped in Crystal Drops in Wisteria.  Iridescent Sequins 'randomly' placed on top and sides of decorated box.
 
White Picket Fence, Hydrangeas and pretty Butterflies......what more do you need for a Cape Cod Garden?
 
Here's what I used:
 
Hydrangea
Impression Obsession


Picket Fence
Amy Design
 
Foliage 1
Paper Smooches

 
Butterfly #2
Dies R Us


Thanks so much for stopping by!
 
Enjoy~~


Saturday, June 11, 2016

Hello Lupines

Good Morning!  Happy weekend!

Today's card will be entered into the Challenges at Papertrey Ink, Shadowing With Copic Markers and Stamping Sensations, Feature A Creature.

 
I used the Papertrey Ink stamp and die sets, Flower Favorites and Fabulous Frames.  I stamped the flowers in 3 different purples, yet it does not show the gradient.  I also added clear glitter embossing powder on top to give it a lovely sheen.  Swiss Dots Embossing Folder. 

 
Using the Die-Versions Curly Words Hello die I cut a couple of layers of purple card stock.  After adding it to the base I took a Copic Marker and created my shadow.  THEN I doused the whole Fabulous Frame in Heat And Stick Powder and Dazzling Diamonds Glitter.  This sucker SPARKLES!  Tucked my Lupines inside, added the butterfly die cut and some Crystal Drops in Wisteria Purple.  Sheer Green Ribbon, square purple button and Baker's Twine for accent.

 
VERY hard to see the shadow, but it is there!
 
Thanks so much for stopping by!
 
Enjoy~~


Friday, June 10, 2016

Another Beautifull Day

Good Morning!

This card will be entered into the Challenges at Altenew, June Photo Inspiration and Penny Black, Flower Power.


I used the gorgeous Beautiful Day stamp and die set from Altenew.  I cut 2 peonies out from water color paper and using my ink pads I 'water colored' the blossoms using light shades of yellow. I also cut 3 sets of the leaves and stamped them in 2 different shades of green.


I added a bit of Black Sakura Glaze Pen to the flower centers, it adds gloss and texture.  Sheer white ribbon topped with a lone large adhesive pearl.  Several rows of adhesive pearls, tear drop adhesive rhinestones and iridescent sequins to mimic Amy's gorgeous wedding dress.  The card stock base is white, layered with a piece of shimmery card stock in a blue/gray/green shade (did you get that?) and then I placed a piece of Vellum over that.  If I make this card again I will add some texture to the sheet of Vellum.
 
Love the photo, loved the Challenge.
 
Thanks so much for coming by, love it when you do!
 
Enjoy~~